25 Best Photoshop Tutorials
Photoshop is a very powerful tool when it comes to designing and editing. It is preferred by people all over the world mostly designers.
Now everybody doesn’t have the proper knowledge of how Photoshop basically works and how you can be its maestro. This is the most popular tool for editing photos or any kind of art. Regardless of whether you are a beginner or an expert, Adobe Photoshop have dependably got the correct tools for you to bring your creative energy into reality.
Internet has a vast variety of Photoshop tutorials which you can learn without stepping out of the house. I am going to list the best Photoshop tutorials with description for your ease so that you don’t have to waste time searching through different tutorials available on internet. With the help of these tutorials you can create some amazing effects and give your dull and old photographs some new energy.
Once you have the knowledge of how to use Photoshop, you will never go back to any other photo editing software. Have fun!
Endless Picture Within a Picture
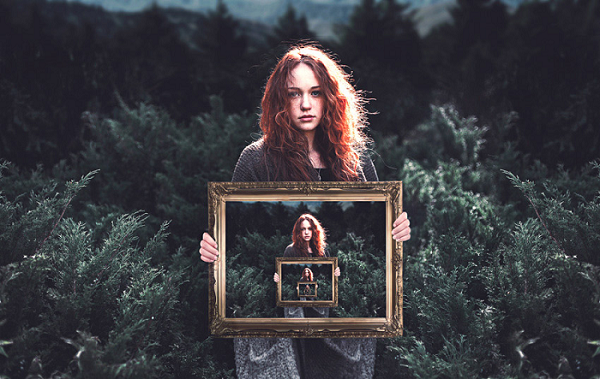
Creating a photo illusion on Photoshop is a great way to test your skills. An extraordinary venture for putting your Photoshop aptitudes under a magnifying glass is to make an optical illusion.
An optical figment makes an ordeal for the watcher that makes them see something that isn’t there or is not the same as how it shows up. This tutorial will guide you step by step on how you can create a picture illusion in Adobe Photoshop which is endless. This tutorial will make it extremely easy to create a photo illusion using some effects, photo manipulation techniques and assets.
You have to pick a photo first and then check the skills you are going to apply in it using this tutorial. It is a very simple guide which will help you master these skills in a very easy way. So, go through the guide and start creating amazing projects right away.
Vintage Style Poster

This is an amazing tutorial where you will be able to learn how to create a vintage style poster in Adobe Photoshop. This is an amazing step by step tutorial with great pictures that will help you master this technique. This method will require using some illustrations and drawing & composition techniques.
This tutorial exhibits strategies to make a vintage style notice in Photoshop. We will likewise be utilizing Illustrator for some basic operations. This is a genuinely straight forward guide using Photoshop’s drawing devices and sythesis procedures. Therefore we will make a feline based vintage notice outline in Photoshop with a little assistance from Illustrator.
We will begin off by setting up the foundation utilizing the surfaces, will make the feline character utilizing the shape devices and add several overlays to give it a vintage touch. I have utilized CS6 Photoshop rendition has been utilized to make this work however any variant from CS3 onwards will be fine too.
Change a Photo from Summer to Winter in Photoshop
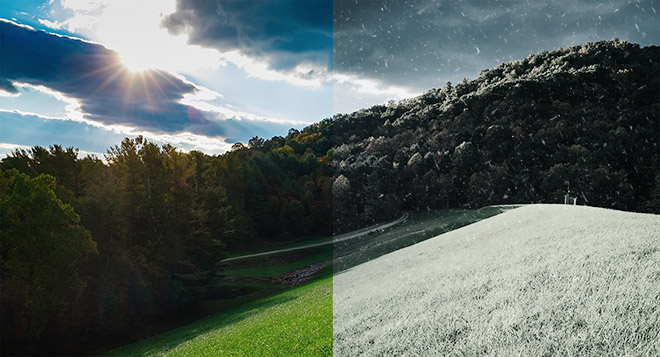
Have you ever thought about changing a photograph of season to another season? You must have at least thought about it at some point of your life where you wanted a different scene in your photograph. This tutorial is all about changing a photo from summer to winter by three simple easy steps.
This is a step by step tutorial with a nice typography that will be of a great help to you. In this Adobe Photoshop tutorial we will take control of the seasons with some Photoshop guile by changing over a brilliant and sunny summer photo into a frigid snowy scene.
We’ll make acclimations to wash out the hues and give the photograph a chilly air, at that point utilize a shrewd determination procedure to include a covering of ice. We’ll even change the climate by adding a whirlwind of snow to totally change the scene! This Photoshop trap works best with scenic pictures that contains bunches of point by point components like grass and trees.
Creating an Abstract Vietnamese Woman Portrait in Adobe Photoshop
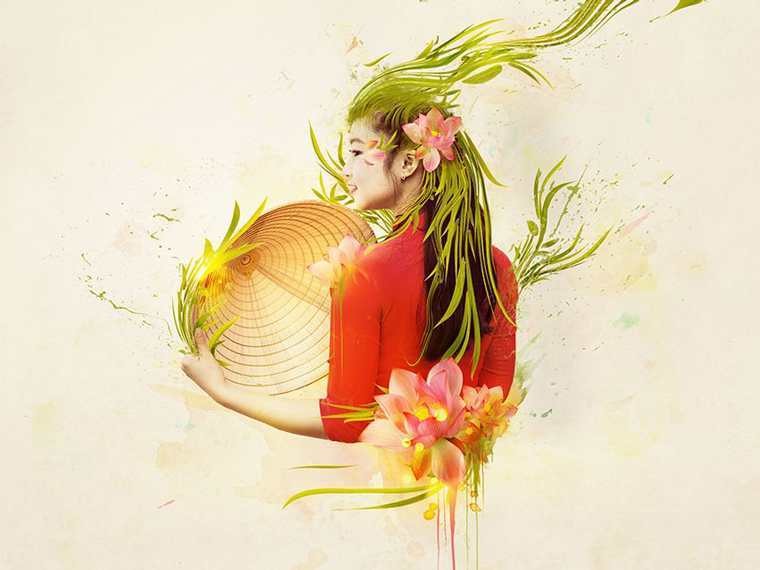
You must have tried to create portraits in Adobe Photoshop but you can’t reach the perfection level. This tutorial is all about creating an abstract portrait of a Vietnamese woman by using different tools. This tutorial is extremely easy and very well written document which will try to take you to the perfection level.
In this guide you will be demonstrated the best practices to make a dynamic piece highlighting a youthful Vietnamese lady in a customary long dress. Long dresses, lotus, and bamboo are known as social images in Vietnam. To begin with, we’ll manufacture the foundation utilizing an old surface and some watercolor pictures.
From that point forward, we’ll include the model and the lotus and bamboo branches. Afterward, we’ll paint some light and include some splatter and bokeh. We’ll utilize a few change layers to finish the last impact. There will be various assets that will be used during this process.
How to Change Background in Photoshop
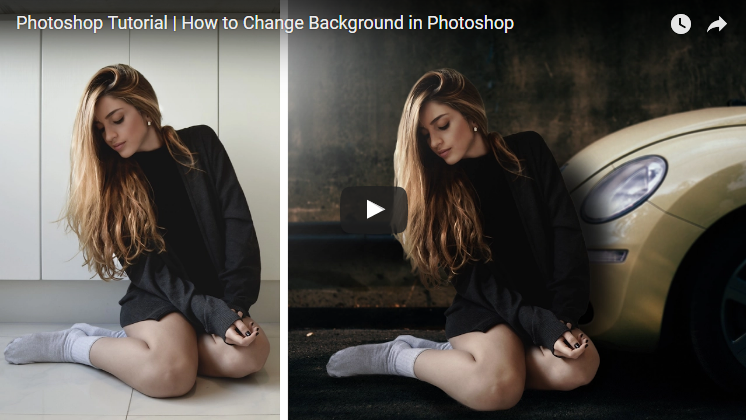
Sometimes we take amazing photos but the background makes it a big No for us to show it to someone or post it somewhere. To solve this issue, this is a tutorial on how you can change the background of your picture perfectly in Adobe Photoshop.
This is a detailed video tutorial that will help you master this skill. In this Photoshop tutorial, you will figure out how to change foundation in Photoshop cs6 and with dim and delicate light impacts in Photoshop cs6. Take after these simple strides to change foundation of photograph in Photoshop.
In this Photoshop guide, you will be demonstrated the best practices to change background and evacuate a foundation and how to include foundation in Photoshop cs6. There will be various methods that you will have to go through. It is a very helpful guide with lots of free tutorials.
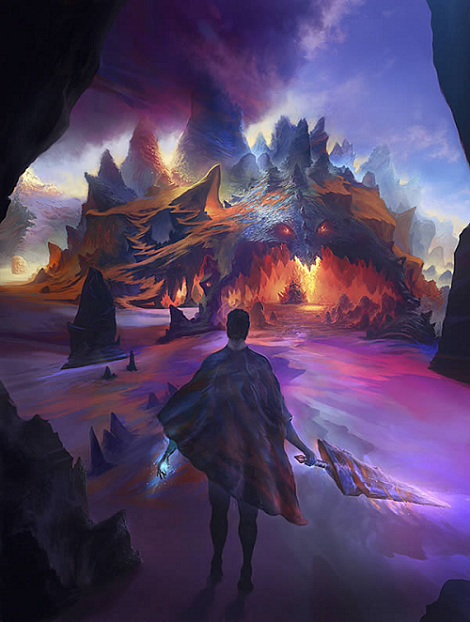
Creating a Mountain Fortress Using Matte Painting Techniques in Photoshop
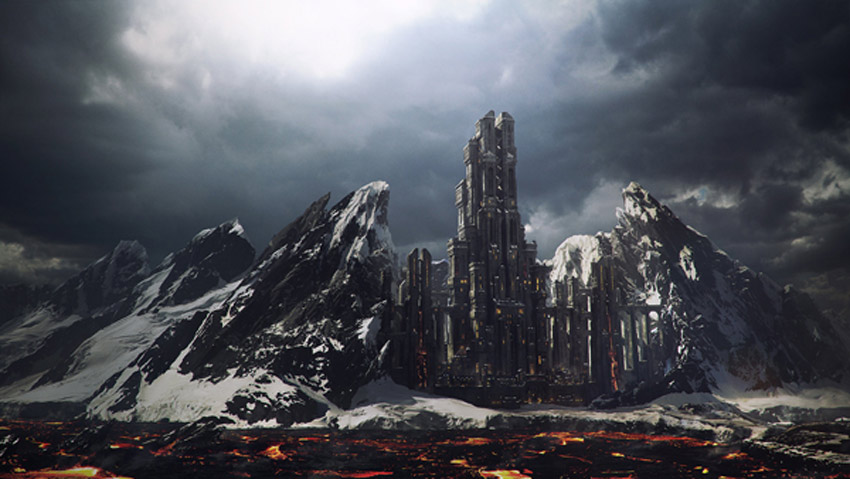
You must have always wanted to create something which you have seen in movies but don’t know where to start from. This tutorial is your life saver if you want to create something which exists in the imaginary or Film/TV world.
In this tutorial you will be demonstrated the methods to make a mountain post from start to finish. At that point you will be demonstrated the generally accepted methods to portray out your thoughts utilizing thumbnail outlines. Once you’ve picked an outline, you will then be demonstrated to proper methodologies to develop your work of art with the assistance of a 3D render, and in addition an accumulation of photos.
In the movie business, producers frequently rely upon craftsmen to make dream conditions that couldn’t exist, in actuality. Present day craftsmen regularly swing to Photoshop, and in addition 3D applications, to make these phenomenal conditions.
Creating Tilt-Shift Photography
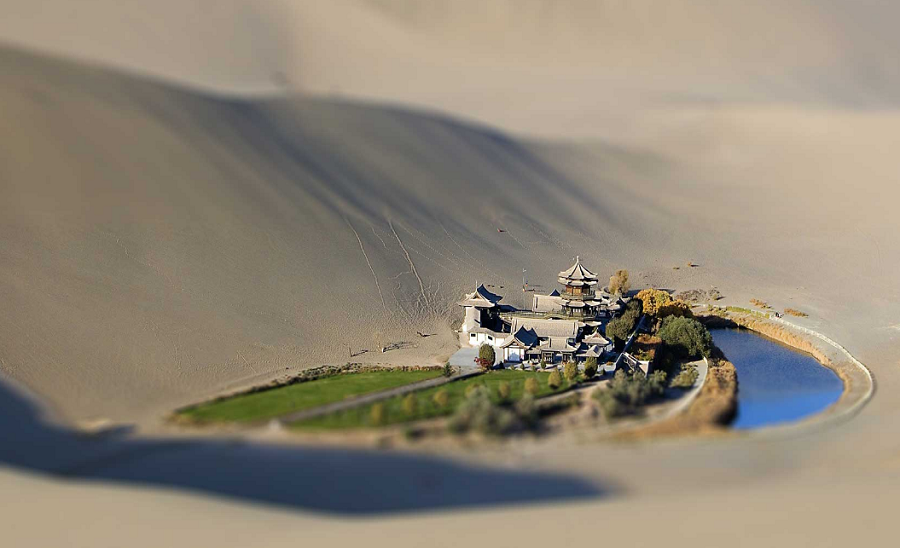
Tilt shift photography is basically to create a miniature out of a wonderful subject. We can do that by using the camera movements or we can achieve this effect with the help of Photoshop. To get the idea of how to do it, open the link and start your work.
Tilt-shift strategy is to make a fake photograph impression of little or magnificent smaller than usual of the subject we will do it. These impacts can be accomplished in numerous ways and it relies upon the clients and inventiveness the client may go. This Tilt-Shift Tutorial depends on NEW Adobe PHOTOSHOP CS6 ? as of now 3 instructional exercises were made and this one is fourth.
It is a great opportunity to delve into the Photoshop CS6 new instructional exercises for making “Tilt-Shift strategy”, there are also some video tutorials that have been added for a better understanding.
Creating a Rainbow In Photoshop
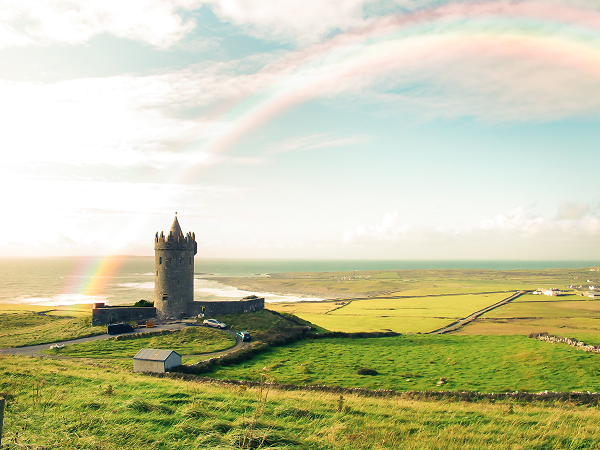
Have you ever wanted to create a fake rainbow and place it over your perfectly taken nature photograph to make it look stunning? With the help of this tutorial you can create a rainbow which will look real and totally amazing.
While making a rainbow, open another record of 10,000 square pixels, just to give yourself enough space. Along these lines, you can glue your completed rainbow onto any photo you like. You can actually begin by setting off to the Gradient instrument and choosing the Rainbow alternative, with straightforward sides.
You have to make it a little flat line simply over the base edge, and afterward go to Rectangular to Polar and click OK. This will make a rainbow ring. This is a super easy tutorial that will let you master this skill within some minutes. You can star off right away.
Creating a Text Portrait Effect in Photoshop
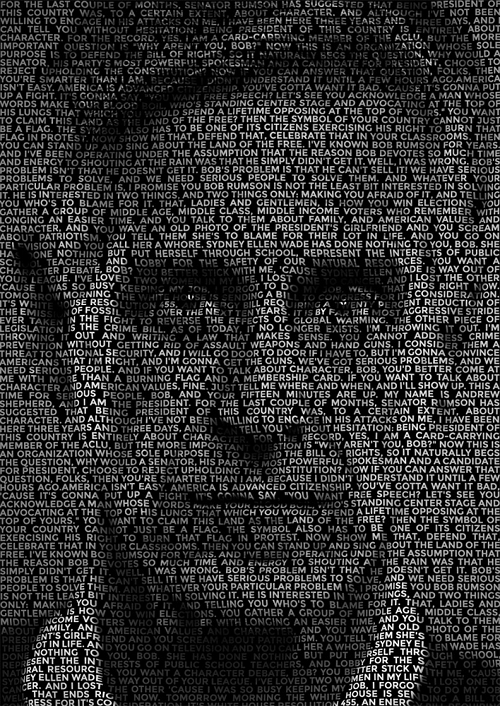
At one point you might have wanted to create a photo with a lot of text on your face like the ones we see in movie posters. With the help of this tutorial you will be able to create a perfect text portrait.
Photoshop?s Displace filter is the key fixing in this formula which permits us to precisely wrap the content around the subject. In this Photoshop tutorial we will make a cool picture impact utilizing a long section of content that curves and disfigures around the forms of the face known as a Calligram, this impact is especially effective when used to display well known expressions or discourses by delineating the creator/speaker with the real words.
Photoshop’s Displace channel is the key fixing in this formula which enables us to precisely wrap the content around the subject. This tutorial will let you learn all the amazing stuff easily.
Creating a Horror Movie Photo Composition
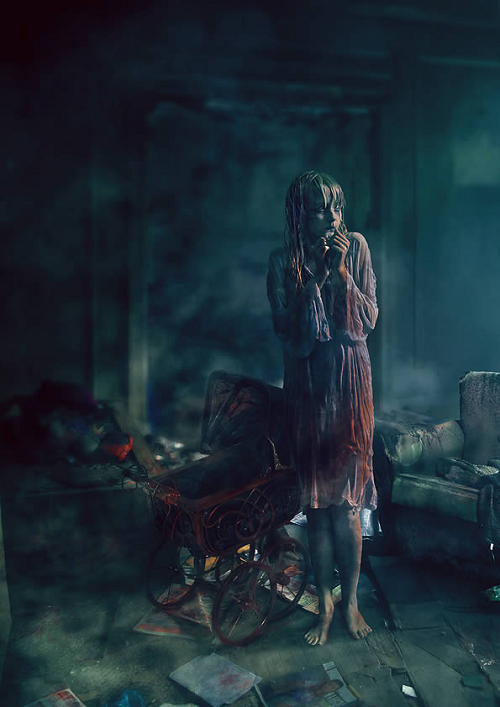
Creating a horror movie photo can be a considerable measure of fun. The most important thing is to pick the right image for creating into a horror picture. In this tutorial you will learn how to create a horror photo using the appropriate light balance, use of mid-tones, depth of field, blending, and more techniques.
Picking the privilege photographs is a critical stride simultaneously; however it is additionally imperative to mix those photographs together in a sensible and conceivable way. In this tutorial we will demonstrate to you best practices to do this utilizing the suitable light adjust, utilization of midtones, profundity of field, mixing, and that’s only the tip of the iceberg.
The accompanying resources were utilized amid the generation of this tutorial like Young lady, Easy chair, Room and Brushes. You can follow this tutorial to master it easily.
Creating a Dramatic Text on Fire Effect
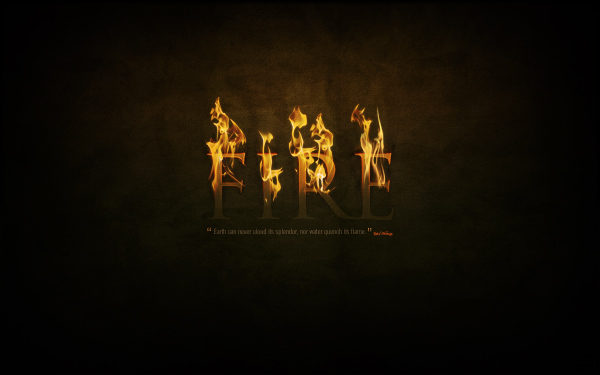
Flares are difficult to render in Photoshop, yet in this tutorial I’ll demonstrate to you industry standards to utilize a photo of flame to set content to the match. We’ll render the expression on a pleasant dark background with a ravishing text impact to finish the picture.
So make another archive in Photoshop at 1920px wide x 1200px high, and with the Gradient Tool attract an outspread inclination of tans so you get something like what is demonstrated as follows. Notice that the slope is not focused vertically but rather sits toward the best. In this picture we need the highest point of the content to be ablaze, so the best piece of the picture ought to be more lit up.
You will get to learn a lot from this tutorial ad then you can apply it on your projects or try it out.
Creating a Cool Watercolor Effect
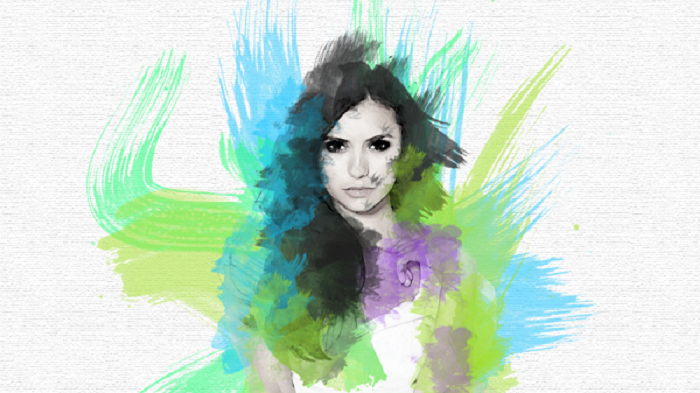
Through this tutorial, you will be able to learn how to create a digital watercolor effect on a photograph. The main focus will be on filter gallery, blending options for certain watercolor effects and downloading free brushes to create the effect.
In this well ordered scene, you will be figuring out how to make a computerized watercolor impact. You will chiefly be concentrating on the channel exhibition, mixing choices for certain watercolor impacts.Furthermore, obviously downloading free brushes to make the impact!
This tutorial is reasonable for fledglings also. You can just go ahead and begin trying out this tutorial on your project that you choose. Try taking a picture and apply these skills on that picture to turn it into that specific effect. So, have a look at this brilliant tutorials and star having fun.
Creating Double Exposure Effect
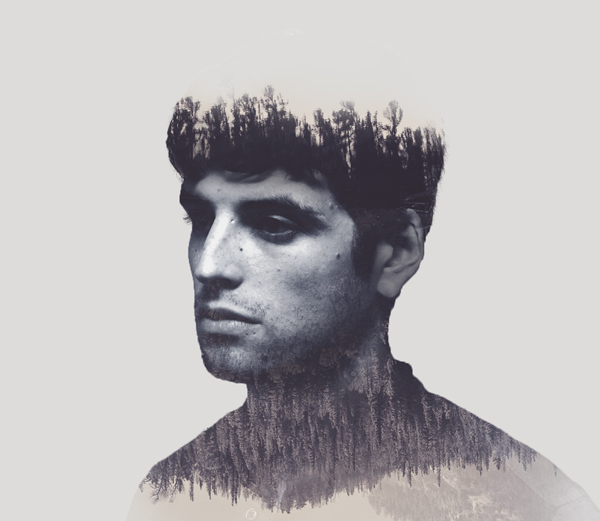
If you are interested in creating an exposure effect of overlapped photos which you might have seen in movie posters or books or art galleries then this tutorial is going to help you with that. In photography and cinematography, different presentation is a blend of at least two exposures to make a solitary picture.
At first, this is a system in which the camera screen is opened more than once to uncover the film various circumstances, typically to various pictures. In any case, with our advanced programming, we can undoubtedly reproduce a comparative impact in Adobe Photoshop.
You’ve most likely observed this intriguing impact of at least two covering photographs on the fronts of music collections, in present day magazines and in notices. In this tutorial we?ll make a stylish twofold introduction impact in Adobe Photoshop.
Creating a Screen Print Design

Screen printing gives an amazing design which is rich in color and it is very popular around the world. Screen printing however is not very simple because you have a limited color palette and you have to make the best images out of that.
So, after this tutorial you will learn how to color up a four color design for screen-printing using Adobe Photoshop and Adobe Illustrator. You will also get an idea of the tricks involved in this process. In this tutorial you’ll figure out how to shading up a four-shading plan for screen-printing utilizing Photoshop and Illustrator.
There are insider tips on the best way to give your picture more profundity utilizing features and shadows, how to make halftone fills that make two tones from one shading, and how to make shading detachments. Regardless of the possibility that you’re not going to screen-print your outlines, this demonstrates to you generally accepted methods to convincingly fake the look.
Age Progression in Adobe Photoshop
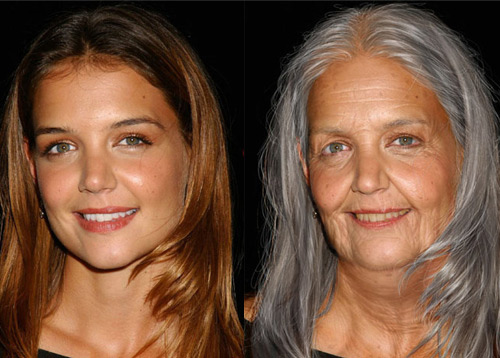
With the help of this tutorial you will learn about how to age progress someone?s face in Photoshop. This tutorial will tell you how to age a woman’s face. There will be a lot of steps where you can also learn about some tricks to master this tutorial.
When choosing to age-advance a big name’s face, you have to choose a photo that is touched-up as meager as could reasonably be expected. The real to life shots, or any shots that have not been taken in a studio, work best on the grounds that the subsequent brutal lighting uncovers a greater amount of the skin’s points of interest i.e. slight packs under the eyes and black out wrinkles.
The presence of such subtle elements makes it all that significantly less demanding to envision how your subject will age. Envisioning what the final product will look like conveys you one bit nearer to maturing her face practically.
Transforming a Portrait Into a Caricature Artwork
![]()
Through this tutorial you will be able to learn how to make an amazing cartoon character using powerful tricks and a lot more effects. You will also learn some hidden tricks to create an amusing artwork. Now and again it’s great to mess around with Photoshop, and today, you will learn well ordered how to make a diverting toon character utilizing some photograph control procedures correcting, and numerous others.
There are obviously numerous approaches to do it, yet you may discover a ton of valuable traps and procedures in this instructional exercise, and with a tiny bit of creative ability, you can utilize it to make your own extraordinary character.
You can easily follow this guide till the end and start working on something right with it so that you can master this skill quickly. Along these lines, how about we begin!
Creating a 3D Black and Gold Text and Logo Mockup

This tutorial is all about creating 3D gold effect. You will be able to create this by using Raleway font and Blue background. This mockup is a piece of the 3D Gold Text Mockups from the portfolio on Envato Market.
You will be going through a lot of steps so be sure to follow all of them to create this cool logo mockup. The accompanying resources were utilized amid this Photoshop tutorial and they are : Raleway textual style, Blue foundation.
Before you start working, download the fonts and keep following this guide for the perfect results. It is a super easy guide which will be of great help and you can actually get in touch with it without having to waste any time and relying upon others.
Creating a Distorted Video Home System Effect in Photoshop
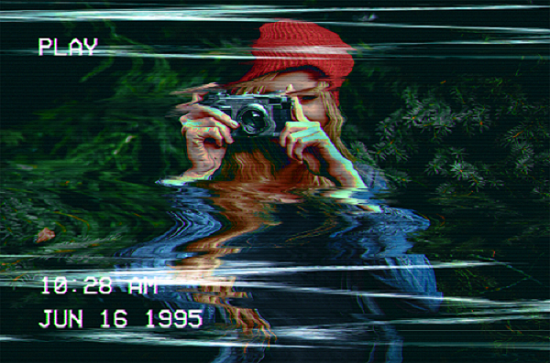
In this turoeial, we will have a fabulous time impersonating the bending impact of VHS tapes in Adobe Photoshop. Through this tutorial you will be able to create distorted Video Home System effect in Adobe Photoshop.
The initial step is to take a photo and twist it with an assortment of systems to mimic the distorting related with old simple film, then you will have the capacity to apply some On-screen display text as a completing touch to give it the presence of a home motion picture being played on a Video Cassette Recorder.
This is a significant unordinary point, yet ideally it will prove to be useful for those uncommon undertakings where you may need to repeat such a style. We’ll take a photo and contort it with an assortment of systems to recreate the distorting related with old simple film; at that point we’ll apply some OSD message as a completing touch to give it the presence of a home motion picture being played on a VCR.
Creating Digital Art ?Drift in Space? in Photoshop
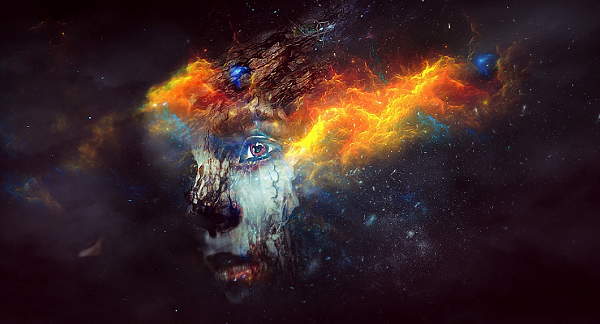
In this tutorial, you will learn the process of creating a Digital Art in Photoshop. You will need some stocks to complete this tutorial and they are Model, Crack Brushes, Rock Texture, Space 1, Space 2.
The PSD document of this tutorial is accessible to purchase on PSD Vault Shop, or by means of the PSD Vault VIP individuals area. The Photoshop instructional exercise is done in Photoshop CC ? consequently some screenshot may have insulting distinctive format as in the prior rendition.
A few brushes are restrictive to Photoshop CS6. In this Photoshop tutorial you will be demonstrated the way toward making this “Drift Space” Digital Art in Photoshop. This is a halfway level trouble instructional exercise and a few stages can be dubious. You can go ahead and just try using something on your own photo or project. Have an attempt!
Creating Realistic Water Drop Reflections
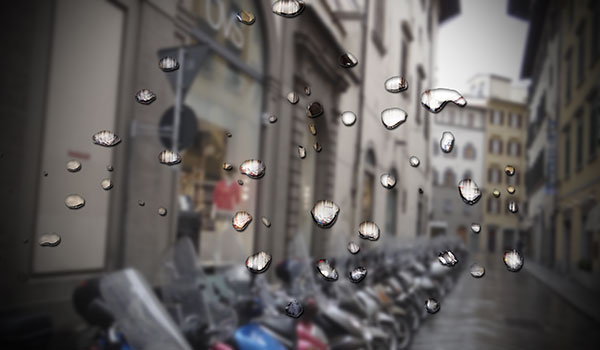
In this tutorial you will need an image to use for the backdrop. Any image can work, but the effect is better with one that looks gray and rainy. As a component of our arrangement on making custom Photoshop Brushes from Scratch, we distributed a Quick Tip on the best way to catch and make custom water drops and hand them into brushes over Adobe Photoshop.
This Quick Tip is an expansion of that lesson. In any case, here we will utilize those brushes to make a photograph control of sensible water drops. To finish this venture you will require the water drop brushes from the past Quick Tip.
You can download those with the Download Attachment connect related with this instructional exercise. You will likewise require a picture to use for the setting. Pretty much any picture can work, however the impact is better with one that looks dim and stormy . A Street Scene has been utilized inside this tutorial.
Create an Abstract Polyscape in Adobe Photoshop
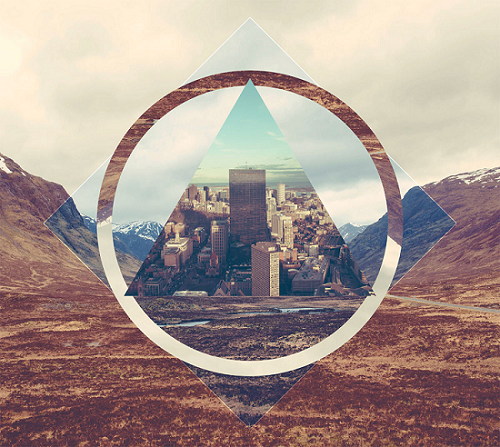
In this tutorial you will learn to create an abstract polyscape effect. The final effect is accomplished with an easy few tactics which you can learn easily. Polyscapes often make use of beautiful landscape images.
The picture I’ll be making as a component of this tutorial joins the photos of rustic Lochearnhead and a differentiating cityscape. Polyscapes regularly make utilization of excellent scene pictures, or even pictures from space. These photographs are then cut and glued into an advanced montage, utilizing Photoshop’s altering instruments as opposed to scissors and paste.
The option of geometric shapes add a unique component to the work of art, I’m utilizing a blend of squares, circles and triangles. Take after these means to reproduce this plan, or explore different avenues regarding diverse resources for accomplish a novel outcome each time! I?ve included what I’ve generally called ‘Geometric Photo Collages’ on my site various circumstances before in motivation exhibits and instructional exercises.
Creating a Colorful Fantasy Digital Painting
In this tutorial, you will know how to create a fantasy digital painting without a sketch. With this tutorial you will know that you can do anything with just the most common brush in Photoshop. In art, there are no wrong answers. That is particularly valid with advanced workmanship.
There are a million procedures to deliver a similar bit of workmanship. A few planners begin with a portray, others make their work of art without an arrangement of any sort. In this tutorial, we will disclose how to make a dream advanced painting without a draw. How about we begin! This piece has been painted utilizing a realistic tablet, a Wacom Intuos 4.
The tutorial can be taken after and achieved without the utilization of a tablet too, however painting with a mouse is not something I’d prescribe. You have less and you have no darkness or stream jitter. With the mouse, it will take you longer, be harder and it’s likely not going to look as exact and pleasant, which is the reason, in the event that you need to get into advanced .
Pixel Explosion Effect
![]()
In this tutorial you will be able to learn the powerful pixel explosion effect. You will be able to use the amazing square brushes to give this effect a nice clean dispersion effect. There will also be a lot of focus on layer masks for a non destructive image.
You can actually very easily figure out how to include an epic pixel blast impact in Photoshop. We will be making our own custom square brushes in the Brush Panel to give this impact a pleasant clean scattering impact.
We additionally will be concentrating on layer veils for a non ruinous picture. This is a simple tutorial for an amazing skill that you can follow till the end. You can also start working on your project with it together so that you won?t have to face nay problem.
Fantasy Composition in Photoshop
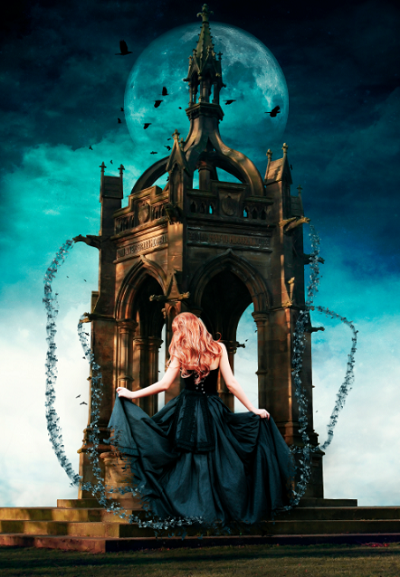
If you are a fan of fantasy and you want to create something which has day and night effect then this tutorial is perfect for you. You can create this fantasy photo manipulation in Photoshop by putting together some images and using some of the Photoshop brushes.
Through this tutorial, you will be able to create a scene with a girl floating in front of a building and few vines that interface the girl to the figures of grotesqueness of the building. There are various assets that will be used to make the photomanipulation. Before we start, I’d jump at the chance to thank the picture takers and specialists for making the pictures and for the consent to utilize them.
It would be ideal if you ensure that you read and regard the stock tenets of every art before utilizing their pictures. Likewise, these assets are simply proposals, I might want to energize you utilize your own inventive judgment and utilize stock photographs that you like or have lying around which will make your work great.
Creating a Glowing Light Painting Effect
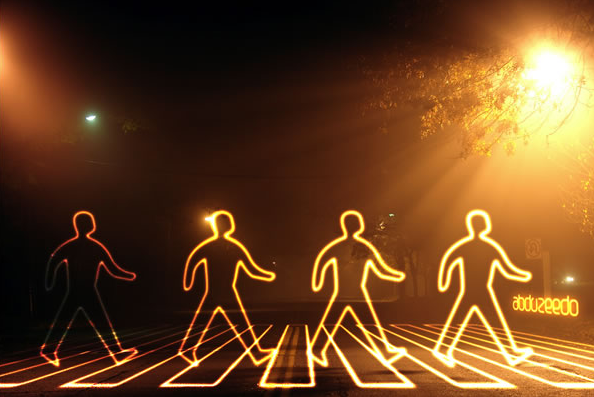
This is a very easy and short tutorial for creating a light painting effect. In this tutorial you will be demonstrated a simple and quick path, to make a light painting in Photoshop.
That is likely the simplest approach to make this kind of light impact; in any case, it relies upon the shade of the foundation. In the event that the foundation is excessively dim, the mix mode won’t work. You’ll presumably need to utilize another with an Outer Glow. You can make the lights brighter by simply copying the layers.
You can even utilize the Eraser Too to make a few changes. The first idea picture can be seen at Light Graffiti In Photoshop. The last instructional exercise picture is underneath.This light effect will look perfect when you have a light background because the blend won’t work on too dark background.